vCenter 5.1 now comes with a Single Sign On Service that enables you to have SSO capabilities for VMware products. SSO is required for vCenter installation in version 5.1 and will probably continue to be. It’s pretty easy to install it if you just use the SQL Express version, however many people would like to install it on an existing database server. Here’s how you can do that:
- Attach the vCenter installation ISO to the vCenter virtual machine.
- Click on vCenter Single Sign On and click Install
- Click Next through the intro screens and the EULA
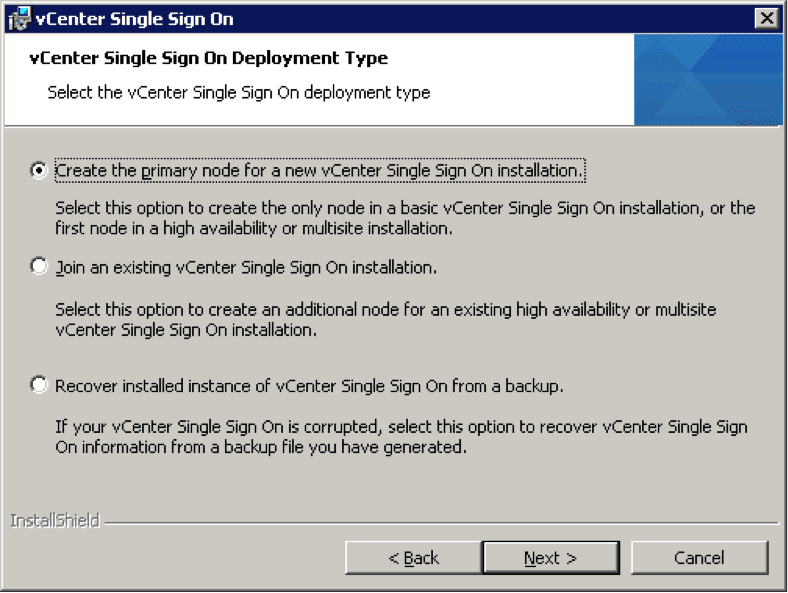
- Click on Create the primary node for a new vCenter Single Sign On installation

- On the next screen, choose the appropriate SSO type. You can choose between a basic install or creating the primary node for a multisite environment. I’m going with the basic install.
- Enter a password for the Admin@System-Domain user. This user is the default admin for the SSO server. Please take note of this password.
- The next screen is the SSO database. Choose the Use and existing supported database option.
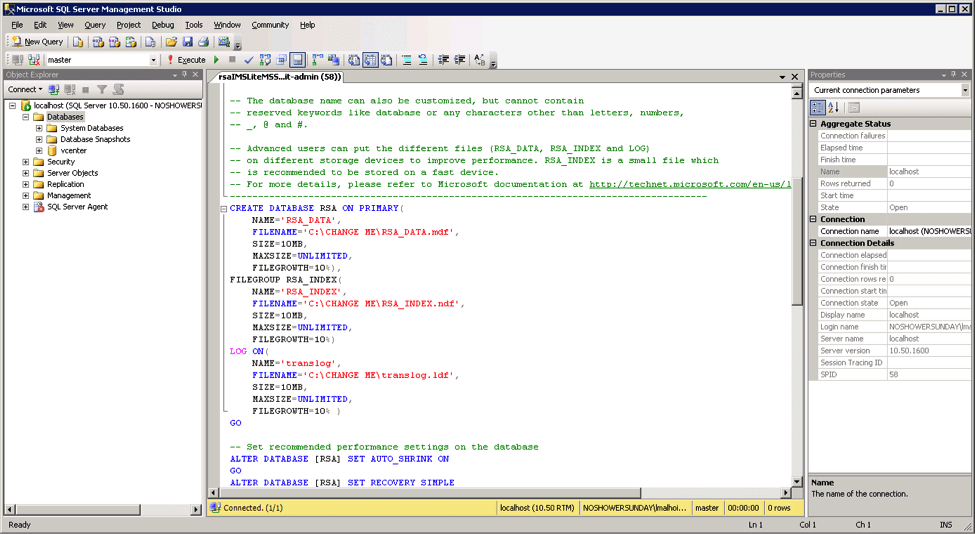
- Open SQL Server Management Studio from your database server.
- Copy the DB Scripts from the Single Sign On folder to the database server (or where ever you have SQL Management Studio open). Double click the rsaIMSLiteMSSQLSetupTablespaces script. In the SQL Server Management Studio, the script will appear. You’ll need to read through it and enter the proper parameters for your environment.
- Press the Execute button to run the script and create the RSA_DATA database. You may need to refresh Management Studio to see the RSA database appear.
- Now, double click on the script called rsaIMSLiteMSSQLSetupUsers to add the users RSA_DBA and RSA_USER. Change the passwords for the two users within the script.
- Now click execute.
- Go back to the installer on the vCenter server
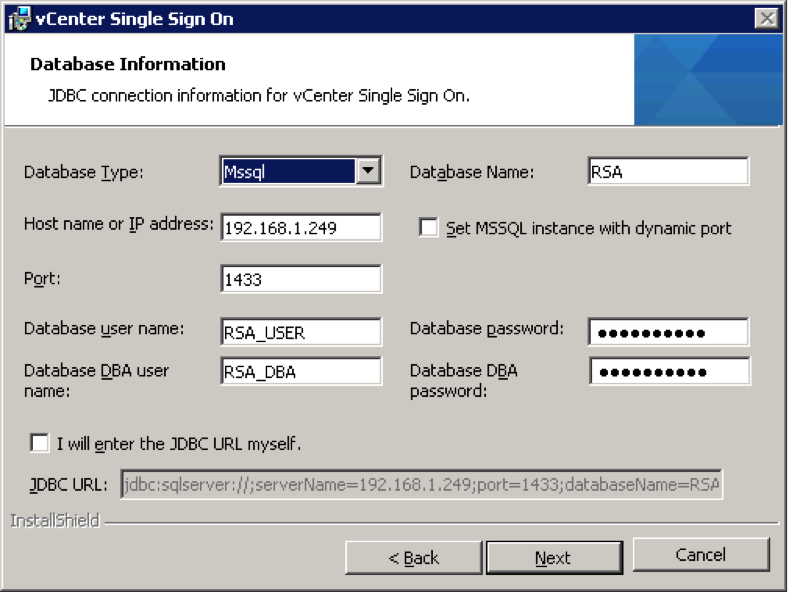
- The next screen on the installer is the Database Information. Fill this out with the information about your database server and the usernames and passwords you used in the script. Click Next.
- Enter the FQDN of your vCenter Server. If you get an error saying it couldn’t be resolved, make sure you’ve put your vCenter hostname in DNS. Click OK on the error.
- You can leave the network service account or specify a service account you’d like to use from Active Directory. Click Next.
- Choose the folder you’d like to install to. It’s often best if you can leave the default. Click Next.
- Leave the HTTPS port set to 7444 if possible. Click Next.
- Click Install. You’ll see the status bar pop up. Wait for the install to complete.
- Click Finish.
Now that you have SSO installed, you can go ahead and install the rest of the components (vCenter Inventory Service and vCenter Server). You’ll probably also need to install vSphere Web Client so that you may configure SSO with your domain users once everything is installed. For more information, you can always refer to the VMware documentation found here: http://pubs.vmware.com/vsphere-51/index.jsp#com.vmware.vsphere.install.doc/GUID-BC044F6C-4733-4413-87E6-A00D3BDEDE58.html